Developing flexible ETL pipelines between databases with Apache Airflow
Source: Developing flexible ETL pipelines between databases with Apache Airflow
Photo by Joshua Sortino on Unsplash
Requires knowledge on: PostgreSQL, MySQL, and as always, Python.
As data engineers, one of our responsibilities is to develop, manage and optimize Extract, Transform, Load (ETL) pipelines to extract data (APIs, web scraping, databases etc.) and load data to the target using appropriate transforms. This goal rarely changes according to role, but the source and destination of data might vary depending on the need. If let’s say, the marketing team decided to measure their campaign performance on various platforms, then this process will require reporting on a daily basis. But, as data team, our goal must be permanently eliminating time-consuming, repetitive processes in our team like going to the website, downloading a CSV, creating graphs out of it, and reporting it to the management & stakeholders using PowerPoint each day. A well-qualified data engineer must always represent solutions to manual processes with the help of automation tools like Apache Airflow, Apache NiFi, SQL Server Integration Services (SSIS), or Talend using excellent data manipulation skills. These tools provides you a framework to organize your pipelines, but the most important thing about a pipeline is its flexibility. As your enterprise grows, your pipeline must be as scalable and flexible as possible to have sustainability in the long term.
Flexible pipelines
Photo by Dragoș Grigore on Unsplash
The most important thing about building a reliable pipeline is its flexibility to the changes. The development team can change the design of the database by adding a new column, changing data type, enforcing default values, adding new tables, or removing deprecated ones. Therefore, our pipeline should be manipulated easily against these changes. In Midas, our solution to this problem is a manager schema with reference tables specifically designed and integrated into pipelines. You can think of it as a pilot cockpit. The essential part of flight instruments of a pilot is the Mode Control Panel which is used to control heading, speed, altitude, vertical speed, vertical navigation, and lateral navigation. Inspired by design, our reference tables will be like the following:
The reference table is designed to be the input to a single or multiple ETL pipelines. Its columns are divided into three groups.
1- Source information — source database (PostgreSQL, MySQL, Cloud Databases), source schema, source table name, and key fields
2- Extraction configurations — extraction type (TRUNCATE/INSERT, UPSERT, DELETE/INSERT), extraction method (JDBC, PXF)
3- Target informations (destination database, destination schema, destination table and target_fields)
Our goal in this tutorial is to build a flexible ETL pipeline that extracts an example dataset from MySQL and ingests it to PostgreSQL using reference tables in the PostgreSQL database.
Tasks that will be covered in this tutorial:
1- Deploying Apache Airflow with Docker Compose
2- Deploying MySQL and PostgreSQL with Docker Compose
3- Data ingestion to MySQL
4- Implementing reference table logic in PostgreSQL to manage the ETL pipeline
5- Developing ETL pipeline to transfer data using Apache Airflow
Setting up the environment
Photo by ANGELA BENITO on Unsplash
Requirements:
1- Docker Desktop
2- Docker Compose (Not required for MacOS users since Docker Desktop includes Docker Compose)
3- Python
4- Clone the repository for required materials
After successfully downloading Docker and Docker Compose, you have specific options to install PostgreSQL and MySQL, but the easiest way is to use docker-compose. I have designed two docker-compose yml files to install both of them for the sake of this tutorial, along with Apache Airflow to use.
After cloning the repository to your local computer, please follow these steps to deploy PostgreSQL, MySQL, and Apache Airflow as docker containers:
1- Navigate to the path of the .yml files using terminal
2- Make sure docker is up and running.
3- Run docker-compose -f etl_databases.yml up -d in the terminal to install Postgresql and MySQL databases.
4- Run docker-compose -f apache-airflow.yaml up -d in the terminal to install Apache Airflow.
5- Run python file, initialize_databases.py, which is located inside the dags folder.
To access the database, you can use different tools, but I highly recommend DataGrip if you are working with multiple databases simultaneously. It also allows manually migrating data between databases.
Helper classes are extremely useful to manage databases without writing any SQL scripts. If you are using Airflow, it is easy to go with already implemented operators like PostgresOperator, MysqlOperator. Unfortunately, after a certain amount of time, you will face limitations when running complex operations like deleting the last 7 days of data and inserting your data where you do nothing on conflict.
That ’s why we prefer to develop a subclass called Database (in connections.py) that offers SQL capabilities in Python. In this way, when you are working with Airflow, you have the option to customize your pipeline. Then, we are able to inherit the methods of the Database from database-specific classes. To do this, we will be using the phrase super().init(
connections.py
Our main class is as following:
class Database:
def __init__(self, database_type, host, port, db_name, user_name, password):
self.host = host
self.port = port
self.db_name = db_name
self._user_name = user_name
self._password = password
self.database_type = database_type
self.conn = self.establish_connection()
self.cursor = self.conn.cursor()
1 2 3 4 5 6 7 8 9 10 11 12 13 14 15 16 17 18 19 20 21 22 23 24 25 26 | |
Now, we will create two child classes for our operations in MySQL and PostgreSQL
class Mysql(Database):
def __init__(self, host, port, db_name, user_name, password):
super().__init__(‘mysql’, host, port, db_name, user_name, password)class Postgresql(Database):
def __init__(self, host, port, db_name, user_name, password):
super().__init__(‘postgresql’, host, port, db_name, user_name, password)
initialize_databases.py
In this code, we will be inserting an example dataset into the Mysql database.
from helpers.connections import Mysql
import pandas as pd
import osCUR_DIR = os.path.abspath(os.path.dirname(__file__))database = Mysql(host=’localhost’, port=‘3306’, db_name=’mysql_db’, user_name=’root’, password=’root_mysql’)database.drop_table(table_schema=’stock’,
table_name=’stock_symbols’)database.drop_table(table_schema=’stock’, table_name=’stock_values’)
database.drop_schema(table_schema=’stock’)
database.create_schema(‘stock’)
stock_symbols_df = pd.read_csv(CUR_DIR + “/tutorial_data/Company.csv”)
database.create_table(table_schema=’stock’, table_name=’stock_symbols’,
columns={‘ticker_symbol’: ‘varchar(20)’,
‘stock_name’: ‘varchar(20)’})database.insert_values(data=stock_symbols_df, table_schema=’stock’, table_name=’stock_symbols’,
columns=’ticker_symbol, stock_name’)stock_values_df = pd.read_csv(CUR_DIR + “/tutorial_data/CompanyValues.csv”)database.create_table(table_schema=’stock’, table_name=’stock_values’,
columns={‘ticker_symbol’: ‘varchar(20)’,
‘day_date’: ‘timestamp’,
‘close_value’: ‘float’,
‘volume’: ‘bigint’,
‘open_value’: ‘float’,
‘high_value’: ‘float’,
‘low_value’: ‘float’})database.insert_values(data=stock_values_df, table_schema=’stock’, table_name=’stock_values’, columns=’ticker_symbol, day_date, close_value, volume, open_value, high_value, low_value’)
When you run the script provided above, then you will be having two different tables which are already downloaded to the repository from the Kaggle dataset, Daily Stock Market Values of Top NASDAQ Companies from 2010 to 2020, and running this code will insert our tutorial data to the MySQL database.
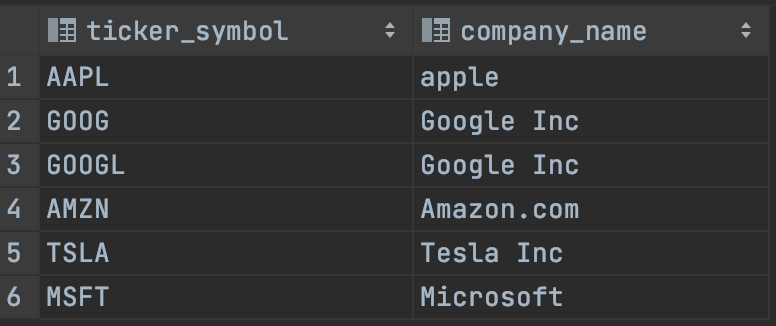
Stock Symbols
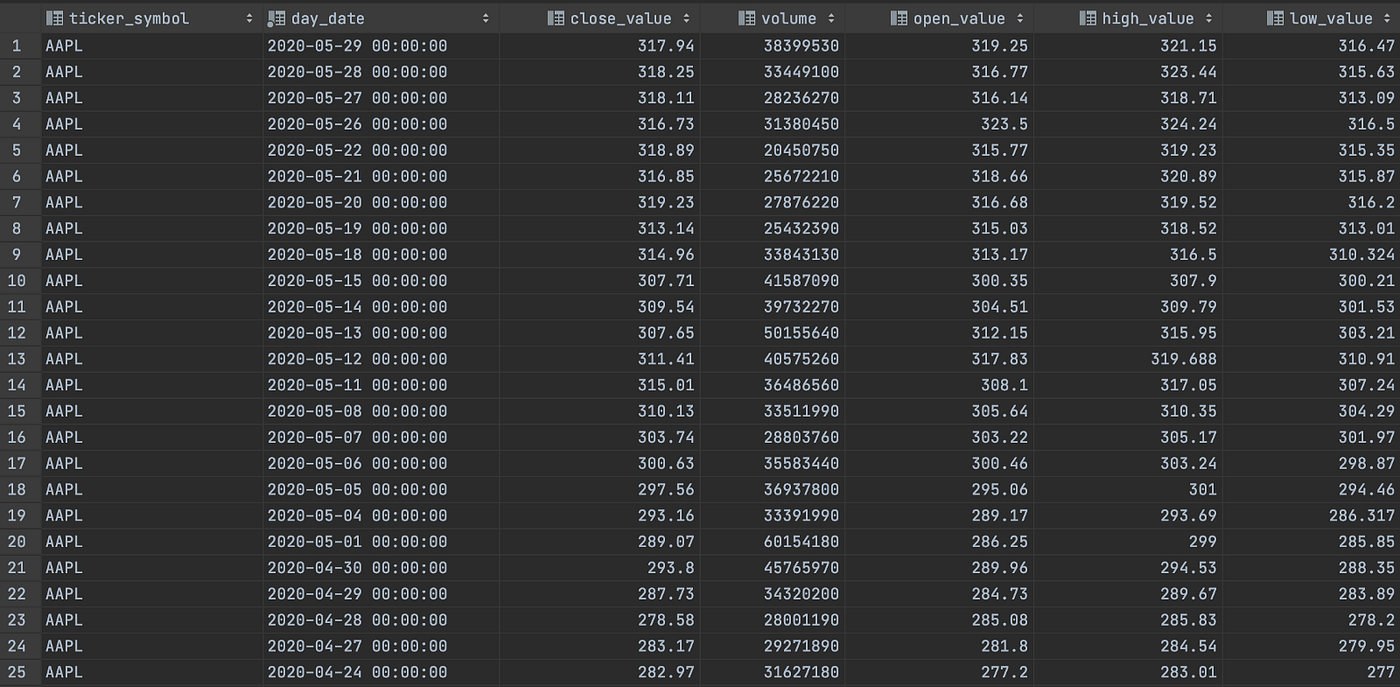
Stock Values
Now, our goal is quite clear. We have to develop a pipeline to transfer these two tables to PostgreSQL. Therefore, we are now ready to create our manager reference table for this particular pipeline in PostgreSQL.
initialize_reference_table.py
Firstly, we will establish a connection to the postgresql database.
from helpers.connections import Postgresql
import pandas as pd
from datetime import datetime
import os
CUR_DIR = os.path.abspath(os.path.dirname(__file__))
database = Postgresql(host=’localhost’, port=‘5433’, db_name=’postgres_db’, user_name=’postgres’, password=’postgres’)
Then, we will create stock_symbols and stock_values tables for the ingestion process under stock schema.
# initialize destination tables for data ingestion
database.create_schema(‘stock’)
database.create_table(table_schema=’stock’, table_name=’stock_symbols’,
columns={‘ticker_symbol’: ‘varchar’,
‘stock_name’: ‘varchar’})database.create_table(table_schema=’stock’, table_name=’stock_values’,
columns={‘ticker_symbol’: ‘varchar’,
‘day_date’: ‘timestamp’,
‘close_value’: ‘numeric’,
‘volume’: ‘bigint’,
‘open_value’: ‘float’,
‘high_value’: ‘float’,
‘low_value’: ‘float’})
Later, we insert two rows to our reference table which will be used in the Airflow DAG.
stock_symbol_dict = {‘insert_date’: str(datetime.now()), ‘source_connection’: ‘mysql’,
‘source_schema’: ‘stock’,
‘source_table’: ‘stock_symbols’,
‘key_fields’: ‘ticker_symbol, stock_name’,
‘extraction_method’: ‘jdbc’, ‘extraction_type’: ‘full’, ‘destination_connection’: ‘postgresql’,
‘destination_schema’: ‘stock’,
‘destination_table’: ‘stock_symbols’,
‘target_fields’: ‘ticker_symbol, stock_name’}
stock_values_dict = {‘insert_date’: str(datetime.now()), ‘source_connection’: ‘mysql’,
‘source_schema’: ‘stock’,
‘source_table’: ‘stock_values’,
‘key_fields’: ‘ticker_symbol, day_date, close_value, volume, open_value, high_value, low_value’,
‘extraction_method’: ‘jdbc’,’extraction_type’: ‘full’, ‘destination_connection’: ‘postgresql’,
‘destination_schema’: ‘stock’,
‘destination_table’: ‘stock_values’,
‘target_fields’: ‘ticker_symbol, day_date, close_value, volume, open_value, high_value, low_value’}
stock_symbol_dict = {k:[v,] for k,v in stock_symbol_dict.items()}
stock_values_dict = {k:[v,] for k,v in stock_values_dict.items()}
stock_symbol_df = pd.DataFrame(stock_symbol_dict)
stock_values_df = pd.DataFrame(stock_values_dict)
database.insert_values(data=stock_symbol_df, table_schema=’etl_manager’, table_name=’database_flow_reference_table’,
columns=’, ‘.join(stock_symbol_df.columns.tolist()))
database.insert_values(data=stock_values_df, table_schema=’etl_manager’, table_name=’database_flow_reference_table’,
columns=’, ‘.join(stock_values_df.columns.tolist()))
Airflow DAG design
Luckily, you have already installed Airflow, and we are going to work with Directed Acyclic Graphs (DAGs). Apache Airflow UI can be accessed by localhost:8080 because of the airflow-webserver configuration on the apache-airflow.yaml file.
The login credentials are both ‘airflow’ for username and password. To build a pipeline, we must have the following functions:
Function 1- Downloads the reference table and returns it as dataframe
def download_reference_table() -> DataFrame:
conn_obj = Postgresql(host=POSTGRE_HOST, port=POSTGRE_PORT, db_name=POSTGRE_DB_NAME, user_name=POSTGRE_USER, password=POSTGRE_PASSWORD)
query = “”“SELECT * FROM etl_manager.database_flow_reference_table”“”
ref_table = conn_obj.execute_query(query=query, return_data=True)
conn_obj.close_connection() # close connection to greenplum db
return ref_table
In this function, we will first establish a connection to Postgresql, run a select query and retrieve the returned data frame. We will be using the returned reference table data to iterate over in our tasks.
Function 2- Extracts data with given schema and table from MySQL database
def extract(source_connection_name: str, schema_name: str, table_name: str, key_fields: str) -> None:
if source_connection_name == ‘mysql’:
conn_obj = Mysql(host=MYSQL_HOST, port=MYSQL_PORT, db_name=MYSQL_DB_NAME, user_name=MYSQL_USER, password=MYSQL_PASSWORD)
query = f”SELECT {key_fields} FROM {schema_name}.{table_name}”
data = conn_obj.execute_query(query, return_data=True)
file_name = f”{schema_name}_{table_name}.csv”
file_path = CUR_DIR + ‘/’ + file_name
data.to_csv(file_path, index=False)
conn_obj.close_connection()
Here, we will establish a connection to the source connection name provided in the reference table and retrieve the key fields from the table again specified in the reference table. The most beneficial factor of using reference tables, a.k.a. a table that manages the pipeline, we can easily add new source databases with minimum code development and change the configurations of the ETL pipeline.
Function 3- Inserts data to given schema and table in the PostgreSQL database
def load_to_target(output_path: str, target_connection_name: str, target_schema: str, target_table: str,
target_fields: str) -> None: if target_connection_name == ‘postgresql’:
conn_obj = Postgresql(host=POSTGRE_HOST, port=POSTGRE_PORT, db_name=POSTGRE_DB_NAME, user_name=POSTGRE_USER, password=POSTGRE_PASSWORD)
1 2 3 4 | |
This function will insert our extracted data to the destination passed as a parameter to the reference table. It is flexible because you can post any data with additional configuration in this function.
So, the entire DAG is easily manipulatable.
Let’s trigger our pipeline and see our green nodes :)
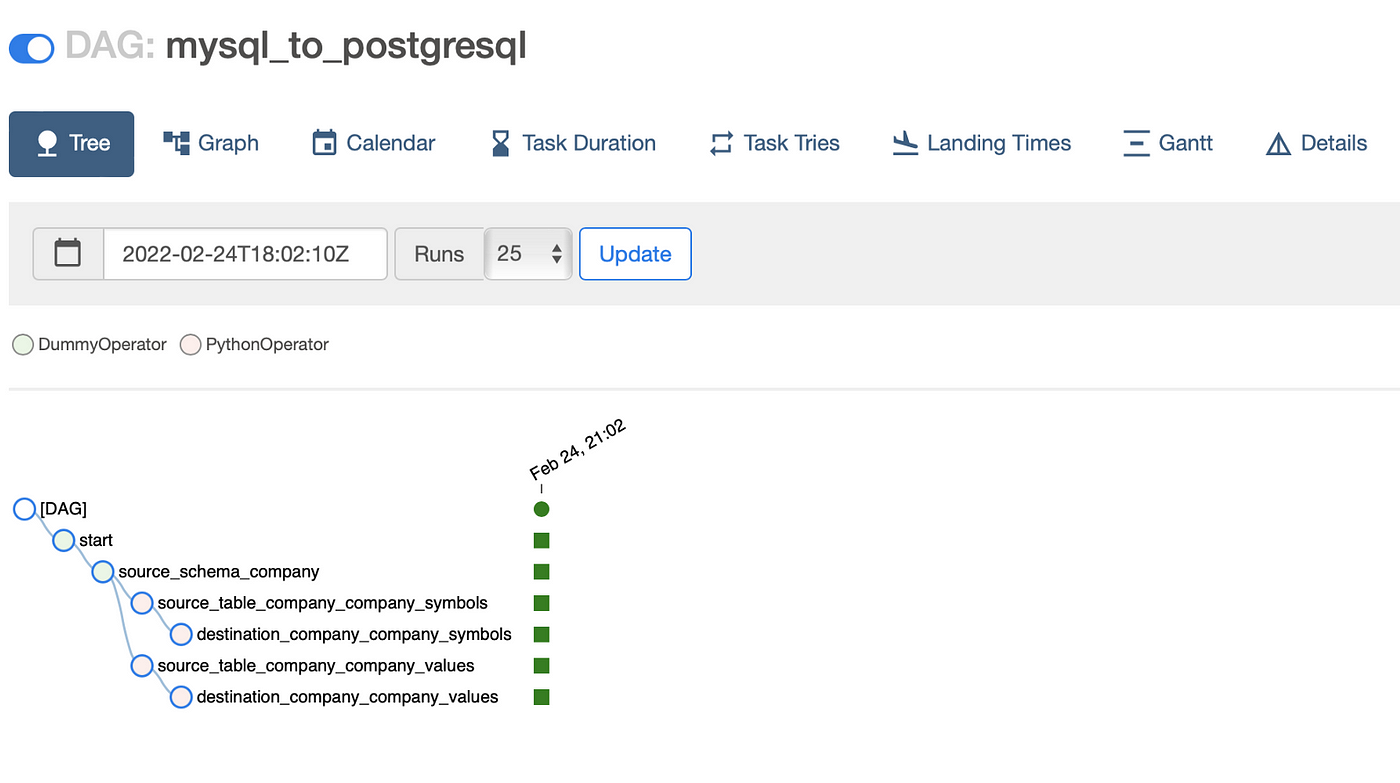
Successful DAG Run
Here we go! Now, we successfully transferred data from MySQL to PostgreSQL using Apache Airflow. Congratulations!
Appendix: Links
- [[JS - Obsidian Web Clipper Bookmarklet|Obsidian Web Clipper Bookmarklet]]
- [[3-Resources/Clippings/_README|Clippings]]